

TL;DR:
- Customizing battle maps enhances immersion and engages players more effectively.
- Planning, creativity, and iterative adjustments are key to building dynamic, memorable maps.
- Ready-made terrain packs offer quick, high-quality options for busy or less artistic dungeon masters.
Picture this: your party finally reaches the climactic showdown with the lich lord. The tension is electric. Then you plop down a blank grid with a few scribbled squares, and suddenly everyone’s staring at their phones. Yeah. We’ve all been there. Bland, uninspired battle maps are the silent killers of immersion, and they deserve to be banished to the Shadowfell. The good news? Building a custom, jaw-dropping battle map is way more achievable than you think. In this guide, we’ll walk you through every step, from gathering your gear to testing your finished masterpiece, so your next session hits like a Nat 20.
Table of Contents
- Gathering your tools and materials
- Designing your battle map: Theme, scale, and layout
- Building and detailing: Bringing your map to life
- Testing, troubleshooting, and evolving your map
- Why evolving your battle maps beats perfectionism
- Bring your campaigns to life with ready-made terrain
- Frequently asked questions
Key Takeaways
| Point | Details |
|---|---|
| Right tools matter | Start with flexible mapping tools—physical or digital—that fit your GM style and group needs. |
| Plan for immersion | Choosing the right theme, layout, and terrain features creates memorable encounters. |
| Details elevate gameplay | Small touches, like lighting or interactive elements, keep players engaged and invested. |
| Iterate over time | Test, adjust, and let player input refine your maps for lasting campaign appeal. |
Gathering your tools and materials
With the challenge set, let’s look at exactly what you’ll need to begin crafting immersive battle maps. The beauty of map-making is that you can go full arts-and-crafts wizard OR become a digital dungeon architect. Both paths are totally valid. Your choice depends on your budget, your campaign style, and honestly, how much you love the smell of fresh markers.
Physical setup essentials:
- A pre-printed or blank grid map (1-inch squares are standard)
- Wet and dry erase markers in multiple colors
- Terrain tokens, standees, or painted miniatures
- Ruler and pencil for initial sketching
- Foam board or cardstock for raised terrain elements
Digital setup essentials:
- Mapping software such as Dungeon Alchemist, Inkarnate, Wonderdraft, or Owlbear Rodeo
- A tablet, laptop, or desktop with a decent screen
- A projector or spare TV if you’re running in-person sessions (this is a GAME CHANGER, trust us)
Bonus upgrades for the truly dedicated:
- 3D printed terrain pieces (resin printers are more affordable than ever)
- Modular dungeon tile sets that snap together like satisfying LEGO bricks
- LED tea lights for atmospheric lighting effects
Here’s a quick comparison to help you pick your setup:
| Setup type | Estimated cost | Time investment | Complexity |
|---|---|---|---|
| Basic physical | $10 to $30 | Low | Beginner-friendly |
| Advanced physical | $50 to $150+ | Medium | Moderate |
| Digital (free tools) | $0 | Medium | Moderate |
| Digital (premium tools) | $20 to $60/year | Low to Medium | Easy once learned |
| Hybrid (physical + digital) | $50 to $200+ | High | Advanced |
If you’re new to all this, check out our deep dive on using battle maps in D&D for a solid foundation. And if you’re leaning digital, our guide on using digital battlemaps covers everything from setup to session-day workflow.
As dynamic maps evolve with player actions and weather, software options that support hex-free layouts are perfect for theater-of-mind hybrid play styles too.
Pro Tip: Go modular whenever possible. Modular tiles and overlays let you rearrange the same pieces into entirely new layouts, saving you hours of prep across multiple campaigns. Reusability is your best friend.
Designing your battle map: Theme, scale, and layout
Armed with your tools, the next step is planning a map that fits your adventure’s goals and atmosphere. This is where the real creative magic happens, and also where most first-time map makers stumble. Don’t skip the planning phase. Seriously.
Start by picking your setting. Is this encounter happening in a crumbling dungeon, a dense forest, a chaotic city street, or the deck of a flying ship? The setting should tie directly into your campaign’s story. A map that feels like it belongs in your world does half the immersion work for you.
Next, decide your scale. The standard is 1 inch equals 5 feet per square, which works perfectly for most D&D 5e encounters. But don’t be afraid to break the grid for large-scale battles, chase scenes, or overland skirmishes. Flexibility here adds narrative texture.
Visual clarity is non-negotiable. Players need to instantly read the map. Define these elements clearly:
- Obstacles (walls, boulders, barricades)
- Cover (half-cover vs. full cover zones)
- Hazards (lava, poison gas vents, collapsing floors)
- Interactive objects (levers, doors, chests)
Here’s a quick numbered workflow for your initial design:
- Sketch a rough thumbnail (seriously, just a 2-minute doodle) to establish the basic shape and flow
- Identify the key dramatic zones: where will the big fight happen, where do enemies start, where are the exits?
- Draw your full layout to scale, starting with walls and major terrain
- Layer in secondary features like furniture, foliage, or rubble
- Add your hazards and interactive elements last
For deeper ideas on building tactical depth with battle maps, we’ve got you covered. And if you want to understand how using terrain for strategy can completely change encounter dynamics, that’s a must-read too.
Pro Tip: Embrace asymmetry. Maps with irregular shapes, off-center focal points, and unexpected terrain features are far more engaging than perfectly symmetrical rooms. Asymmetry creates natural chokepoints, flanking opportunities, and dramatic moments that players will talk about for weeks.
Building and detailing: Bringing your map to life
Once your plan is solid, it’s time to build. This is the part where your map actually takes shape, and where small details make an enormous difference.
Follow this step-by-step build sequence:
- Lay your base layer first: draw or print your grid, define your boundary walls, and establish the overall footprint
- Add major terrain features: large rocks, trees, water bodies, raised platforms
- Place obstacles and cover elements: barricades, pillars, overturned carts
- Layer in lighting and atmosphere: mark torch sconces, windows, magical light sources, or areas of darkness
- Finish with interactive and destructible elements: doors that can be barricaded, chandeliers that can be cut loose, barrels that explode
“Dynamic battle maps keep players engaged by responding to their actions.”
And the data backs this up in a big way:
STAT: 70% of players report better engagement with dynamic, interactive maps compared to static ones.
That number should light up your brain like a Nat 20. Players aren’t just passive observers of your map. They want to interact with it. A chandelier they can drop on enemies. A dam they can break to flood the room. These moments become legendary.
For inspiration on what’s possible, browse our collection of inspiring battle map examples. And if you want to understand how maps unlock tactical play with maps at a deeper level, that’s worth exploring too.
Pro Tip: Use modular overlays for dynamic terrain changes. A simple blue acetate sheet becomes a flood. A red overlay signals fire spreading. Swap them in and out live during the session for dramatic, reactive storytelling without rebuilding your whole map.
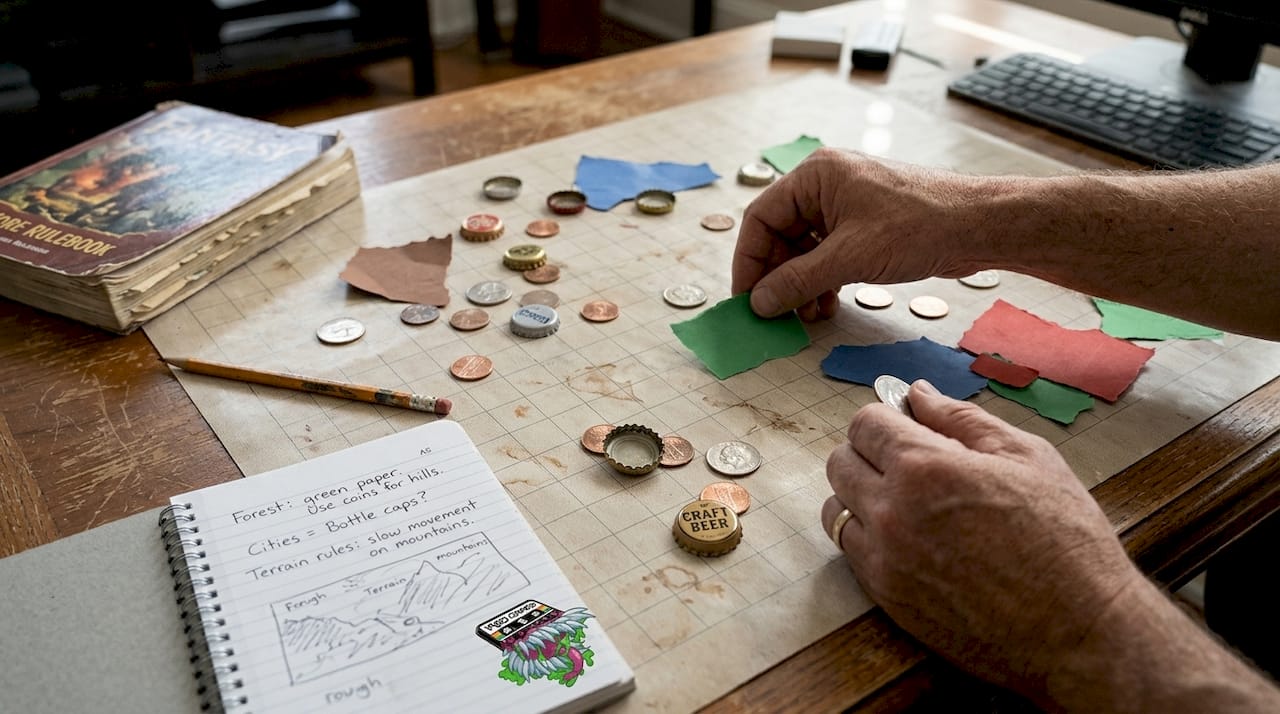
Found objects are also your secret weapon. Coins make great boulders. Bottle caps become wells. A crumpled piece of brown paper is suddenly a rocky outcrop. Creativity costs nothing.
Testing, troubleshooting, and evolving your map
With your map deployed, it’s time to refine your craft through live play and iteration. Even the most experienced dungeon masters run into surprises at the table. That’s not failure. That’s data.
Before your session, run through this quick checklist:
- Can players clearly identify terrain types at a glance?
- Is the map balanced? Does one side have a massive tactical advantage that wasn’t intended?
- Are there enough interactive elements to reward creative thinking?
- Is there room for miniatures to move without constant confusion?
Common mistakes and how to fix them:
- Map is too cramped: Increase your scale or reduce the number of obstacles
- Players ignore terrain: Make terrain effects more dramatic and mechanically meaningful
- Map feels generic: Add one signature feature, a specific detail that makes this map unmistakably unique
- Lighting is confusing: Use color coding or symbols to mark light and dark zones clearly
- Encounter ends too fast: Add reinforcement spawn points or secondary objectives to extend engagement
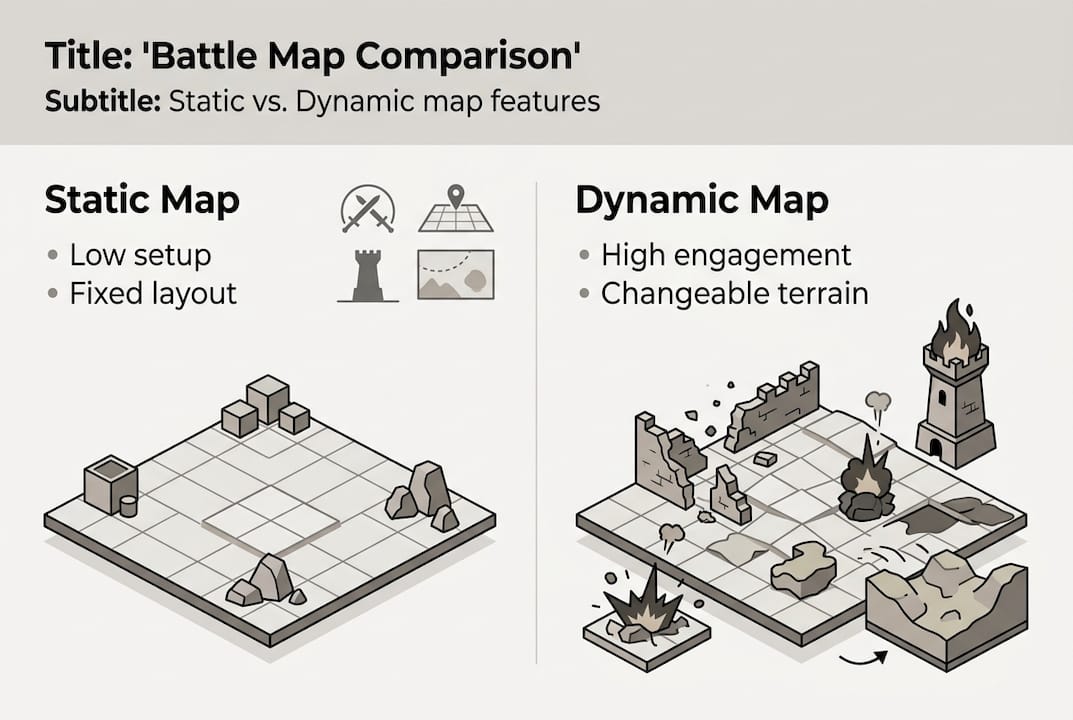
Here’s a comparison of static vs. dynamic map approaches to help you decide where to invest your energy:
| Feature | Static map | Dynamic map |
|---|---|---|
| Setup time | Low | Medium to High |
| Player engagement | Moderate | High |
| Replayability | Low | High |
| Prep complexity | Simple | Moderate |
| Memorable moments | Occasional | Frequent |
After each session, jot down what worked and what didn’t. Player reactions are gold. Did they completely ignore that trap you spent an hour designing? Move it. Did they love the collapsing bridge? Build more moments like it. As maps evolve with player actions, your design instincts sharpen with every session. For more on maximizing your encounters, check out our guide on battle map tactics.
Why evolving your battle maps beats perfectionism
Here’s the contrarian take nobody tells you at the start: your map does not need to be perfect before play begins. In fact, chasing perfection before your first session is one of the most common traps dungeon masters fall into. We’ve seen it happen. You spend three weeks on a map, players take an unexpected route, and suddenly your masterpiece is irrelevant.
True immersion doesn’t come from a flawless map. It comes from a map that responds. Leave deliberate open spaces on your map. Blank zones that you can fill in based on where the story goes. Let player choices shape the terrain. That’s not laziness. That’s collaborative world-building at its finest.
The best maps we’ve ever seen weren’t designed in isolation. They grew from actual play, from player decisions, from wild moments nobody planned. A dungeon that started as a simple cave became a three-session saga because the players decided to live there.
Introducing new map features mid-session is also wildly effective. A sudden rockslide. A rising tide. A secret door that appears when the right spell is cast. These surprises create the kind of dramatic tension that no amount of pre-session planning can manufacture.
Use strategic terrain use as a living tool, not a fixed blueprint. Iterate. Adapt. Let your maps breathe.
Pro Tip: Keep a “map journal” after each session. Note what players loved, what confused them, and what you’d change. After three or four sessions, you’ll have a personal design playbook that’s worth its weight in gold pieces.
Bring your campaigns to life with ready-made terrain
Not every dungeon master has hours to hand-craft maps from scratch, and honestly? That’s completely fine. Sometimes you need a shortcut that doesn’t sacrifice quality.
That’s exactly why we created our terrain and map packs at 1985 Games. If you want stunning, professionally designed maps without the time investment, Dungeon Craft: Volume 2 delivers a massive collection of versatile, high-detail battle maps ready to drop into any campaign. For darker, more atmospheric adventures, Dungeon Craft: Cursed Lands brings a hauntingly beautiful set of terrain maps perfect for horror-tinged sessions. Both packs are designed to spark player engagement from the moment they hit the table. Come explore what we’ve built for your next adventure.
Frequently asked questions
What is the best size for a D&D battle map?
Most D&D maps use a 1-inch equals 5 feet grid, but the ideal size depends on your encounter scale and available play space. Larger battles may need bigger footprints, while tight dungeon rooms work well at smaller dimensions.
How can I add dynamic elements like weather or destructible terrain?
Use modular overlays or digital layers that you can swap or update live during play. Simple tools like colored acetate sheets or printed overlays work beautifully for physical setups.
Do digital maps work well for in-person groups?
Absolutely. Projectors, TVs, or tablets make digital maps interactive and visually impressive for in-person sessions. Many groups find the switch from paper to digital dramatically increases player engagement.
How can I keep my battle maps from getting repetitive?
Experiment with new settings, rotating obstacles, and terrain effects based on player feedback after each session. Introducing one new signature feature per map keeps things fresh and gives players something to look forward to.